Create a New Position: Start
Non-Pooled Student
Take me to the Create a New Position section of HRMS. ![]()
Help sections available for the Create a New Position process for non-pooled students:
Start | General | Salary & Funding | Purpose & Functions | Document Review
The Create a New Position process enables you to create and route non-pooled student position-related documents. You can access this section from the HRMS Home page or from a link on the top right side of the Browse Positions page.
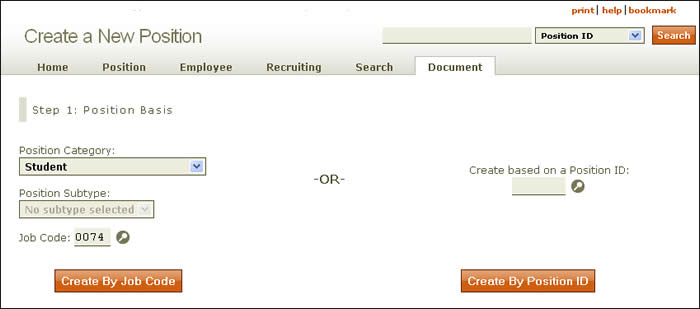
- The Create a New Position page lets you create a position by job code or by position ID.
- By job code:
- Use the drop-down menu to choose the student position category. Subtypes are not available for this position type, so the corresponding menu will remain grayed out.
- Enter a job code, using the lookup
 as needed.
 - Click Create By Job Code.
- By position ID:
- Enter a position ID, using the lookup as needed.
- Click Create By Position ID.
- Enter a position ID, using the lookup
- By job code:
- HRMS takes you to the second screen in sequence, as shown here.

- The origination date defaults to the current date; however, you can change it by clicking the calendar icon or by entering the date manually using the MM/DD/YYYY (month/day/year) format. This date is the first day an incumbent may be assigned to the position.
- Leave the box unchecked to indicate that this is a non-pooled position.
- Next, enter the position’s hours per week.
- Provide the reports to unit number, using the lookup as needed.
- The Creator Desk refers to the authorization (desk) assigned to the user who is creating the document. Click the lookup to select the appropriate creator desk for the document. This desk serves two functions: First, any user with this desk authorization can make updates to the document while it is in Created status and can approve it to route forward. Second, this desk in combination with the owning unit code and account(s) assigned to the position will determine routing for the document.
NOTE: The field will pre-populate and may need to be changed. You can type in the desk name or click the lookup icon to select a different creator desk. - Identify the duration of the student position: Expected to continue, Terminates on ______ (enter a date in MM/DD/YYYY format or use the calendar icon), or Terminates on unknown date.
- Click either Walk-me-through or All-in-one to go to the Create a New Position: General section.
- The Walk-me-through option takes you through the document section by section.
- If you select the All-in-one option, all sections in the Create a New Position document appear in a single scrolling page.
Take me to the Create a New Position section of HRMS. ![]()